Most crafters are familiar with spongey ink pads (and the inevitable dyed finger tips that result from traditional stamping), but crafting inks are available in a number of formats that can each be used to create unique and interesting effects.
If you’re new to paper crafting, spray mists and inks can seem daunting. Never fear! They’re actually quite easy to use, and they’re more versatile than traditional inkpads.
Let’s jump in:
What Are Spray Mists?
Spray mists are available from a number of different companies and suppliers, but they’re all essentially the same thing: ink you spray from a small bottle, rather than ink applied to a stamp from a spongey inkpad. They come in basically every color, from bright, vibrant hues to pearlescent tones and even clear sprays, and are typically sold in small, two ounce bottles.
Most spray inks are dye based, which means they’ll react with water, even once they’ve dry.
What Can Spray Mists Be Used For?
Spray mists are often applied directly onto paper to create customized background patterns, or sprayed over a stencil or mask to create specific designs.
Here are 8 fun ways to use spray mists in your paper crafts:
1. Spraying
The most straightforward way to employ your spray mists is to – you guessed it – spray them! Simply place your paper in a sink or cardboard tray (to catch any wayward droplets), hold your spray mist bottle about 5” away, and spray. For a lighter color, hold the bottle slightly further away; for deeper color, spray on multiple layers. Just be careful not to spray with the nozzle pointed downwards – this can cause the nozzle to clog.
Here’s how to do it:
2. Soaking
You can also soak your paper in ink to create a saturated or antique effect. All you have to do is pour some ink in a container and place your paper in the ink. The longer your paper sits, the more color it will absorb.
3. Splattering
Try creating a splatter effect à la Jackson Pollack by tapping your spray inks onto your paper.
To use this technique, spray a bit of mist into the bottle’s cap or into another small container like a thimble. Clear your work area of anything you don’t want to get ink on. Hold the cap about a foot away from your paper and flick your wrist to create a splatter effect. Blot the splatters with paper towel and allow your design to dry.
4. Tapping
This technique is similar to sponging paint onto your walls. Pour some ink into a container, dip a piece of paper towel, plastic wrap, or any other medium into the ink and tap it onto your paper using a light touch. Experiment with different media till you find an effect you love!
5. Watercolor wash
Treat your spray mists like watercolor paint and create translucent, vivid colorful washes.
Spray some mist onto a plastic palette or plate, then lightly mist your paper with water. Use a flat, moistened brush to apply a thin layer of ink, known as a “wash”, to your paper. Clean the brush and apply more layers as desired. Don’t be afraid to experiment with different color combinations!
Here’s how:
Instead of applying a wash, you can also use this method to color in stamped images. Watch this video to learn how:
This white paper is perfect for the job!
6. Texturing
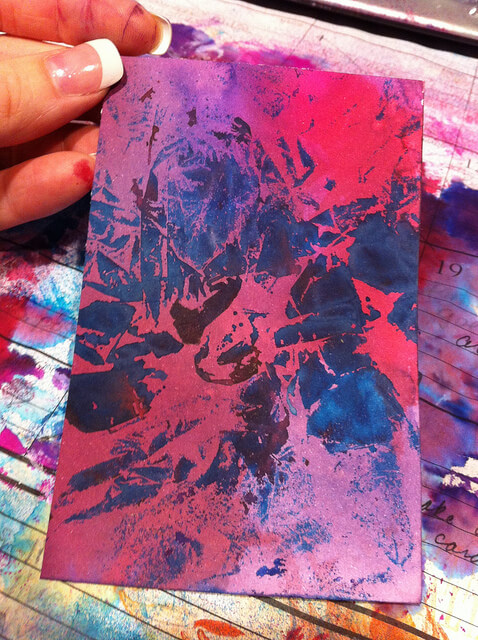
Add texture to your spray inks by pressing textured media like bubble wrap or fabric onto wet mist. Whatever media you choose will lift away some of the ink, leaving behind a unique pattern.
Etsy Ketsy used plastic wrap to create this pattern:
7. Daubing
Create swashes, swirls, or any design you please by using a special dauber cap instead of the bottle’s standard spray nozzle.
To daub your spray mists, remove the spray nozzle and replace it with a special dauber cap. Give the ink time to soak into the dauber, then turn your ink bottle upside down and press the dauber firmly onto a pile of scrap paper until the dauber is completely saturated. Once your dauber is ready, you can apply the ink in whatever manner you choose!
8. Stenciling
Create beautiful stenciled images by spraying your mists directly over any stencil you choose. Watch this video to learn how stencil with spray inks:
Get more fantastic stenciling ideas.
Tips for Using Spray Mists
Spray mists are easy to use, but require different techniques and maintenance compared to inkpads. Here are some tips for getting the most out of your spray mists:
- Always test with a swatch. Different spray inks will appear differently on different types of paper. Make sure your spray mists will create the effect you want by testing them on various mediums.
- Check before you shake your ink bottles. Some spray mists need to be shaken well before using, while others should never be shaken at all. Read the label carefully before you shake your spray mists.
- If your nozzle gets clogged, run it under warm water for a few minutes, then spray out any excess water. This should get your mists moving again! Do not use a pin to unclog your nozzle – this can puncture the nozzle and damage your mists.
Mist Opportunities
Spray mists are a great way to add vibrant colors and unique textures or patterns to your paper crafts. So roll up your sleeves and get creative!